Category: Uncategorized
Story Development for Video Games
Artist Image Manipulation Technique Review & Analysis
Concept Art Technique Review & Analysis
Protagonist VS Antagonist Character Profiles (Bladerunner)
Writing Development – Intriguing Openers
Extras

Here is a document that I created for the group so that we could create stylised character concept pages. This helped the group maintain a consistent theme as we were creating our characters and also stopped formatting discrepancies.
Learning to Program in Maya
I decided to experiment with scripting in Maya some more, naturally as a programmer the tools that Maya provide are intriguing so I attempted to create some cool functionality that I could benefit from in the editor.
I’ll be using the official autodesk documentation to help me out.
There are two main options for scripting in Maya.
maya.cmds a Python Wrapper that replaces the default MEL scripting.
pymel.core a more Object-Oriented wrapper for MEL which organises commands differently to maya.cmds.
I am used to Object-Oriented programming with C# in Unity, so I decided to try something new and jump into the more procedural kit used in maya.cmds, it’s always fun to learn something new!
Getting Started
The most intriguing part of the scripting in Maya, to me, is how every action you take is printed into the console, allowing you to see the related commands and inputs needed to perform even the most simple of tasks.
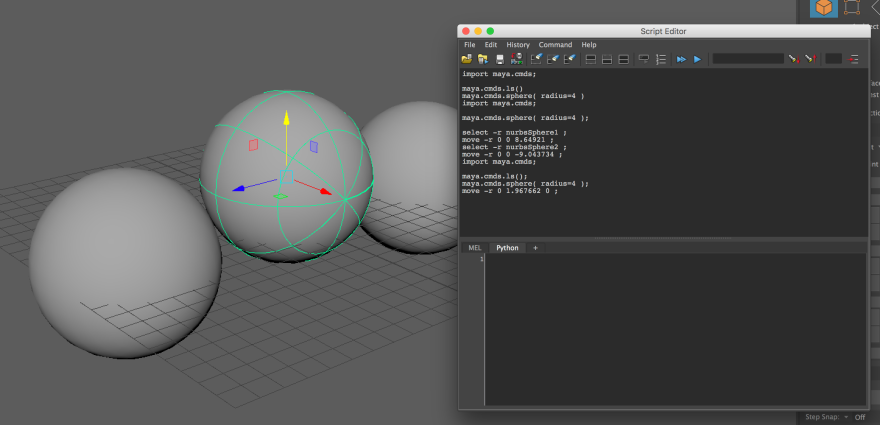
I think that this alone will make learning Maya relatively easy, at a core level, as I can learn by doing. For example, in the screenshot above, you can see on the final line of output in the console, I moved my sphere by the Vector(0, 1.967662, 0), so I moved my sphere nearly two units upwards on the Y axis.
Simple debugging like this should allow me to learn the basics of Maya quite quickly, it will also make finding issues faster as every action is outputted to this console – which is great!
At this point, I decided to switch to the local MEL support – as that is what the console was outputting, so it would allow me to simply stitch commands from the console together to create behaviours that I wanted, whilst avoiding the missing syntax that I’d need with Python.

I’m going to start off with trying to generate some 3D fractals, I had fun doing this in Unity a while back, so it should be fun to do in a 3D engine.
First off I’ll click on the generate cube button that Maya has by default – I can see in the output that this command is called
polyCube -ch on -o on -cuv 4 ;
From this I can see that the command I am calling is polyCube – and then I’m adding some parameters, I must have to specify which parameter I am sending followed by the value of said parameter. This is strange to me as I am used to just sending the values of the parameters in a certain order without actually naming the parameter I’m sending – which has me curious – can I send the parameters in a different order with the same base values?
That’s actually really cool!
polyCube -o on -ch on -cuv 4 ;
Works exactly the same, as the line I used earlier – I guess this is one of the differences between procedural and Object-Oriented Programming, it’s nothing huge but it’s a pleasant change to what I’m used to.
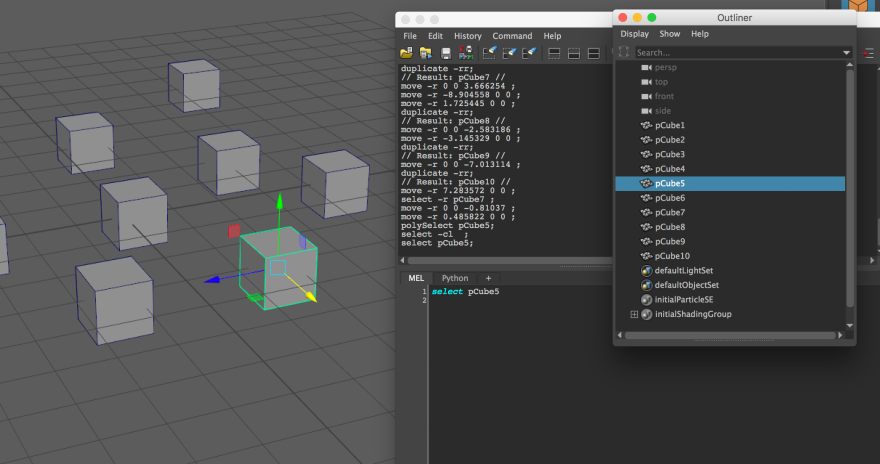
Selecting objects in MEL is relatively easy, I just have to know the specific names of each object in my scene. This would get difficult for projects where I create everything myself with my own naming conventions, but for procedural fractions I can use Maya’s own default naming conventions to reference most objects.
With this in mind, I should be able to create a string array with a list of all existing pCube objects in the scene using the ls function.
The ls command returns the names (and optionally the type names) of objects in the scene.
The most common use of ls is to filter or match objects based on their name (using wildcards) or based on their type. By default ls will match any object in the scene but it can also be used to filter or list the selected objects when used in conjunction with the -selection flag.
Using this I can search for all objects whose name starts with pCube by calling:
string $cubes[] = `ls “pCube*”`;
The * in this line acts as a wild card, basically asking for all objects whose name start with pCube.
Then, simply calling select $cubes; will select all of the cubs in my scene.
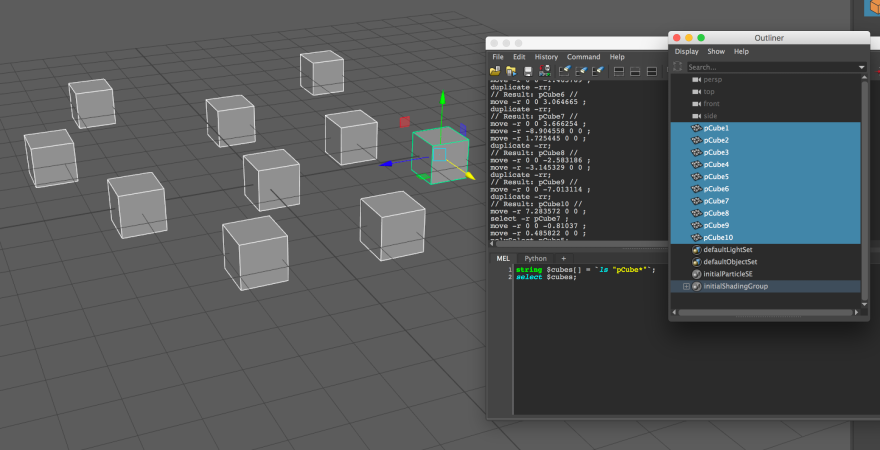
Which worked perfectly!
Using this knowledge to create a fractal!
Now that I’ve figured out the basics, I can use my new knowledge to actually generate a fractal!
The logic is relatively simple in Pseudocode it goes something like this:
DeleteExistingCubes()
SetStartSizes()
CreateFractal()
{
numMade-=1
if (numMade < 0)
return;
else DoFractalGeneration;
}
That’s the core logic that we need, but generating the Fractals is the complicated part and requires the most amount of code.
We need to create six new cubes for every cube that we make, a new one for every face – and then we delete the cube that collides with the face that the existing cube is on. We can skip deleting the extra cube if we check to see which side we are facing, and use that to determine if we generate a fractal or not.
On top of that, every time we generate a cube, we need to make sure that the next layer of cubes is generated at half the size of the current cube.
We also need to make sure that the cube is centered on the parent cube, to do this we will divide the size by 4 and add the next size, so that we can get an offset for the next position – this should work okay.
Once we’ve done that, we need to call the function from within itself, a process called Recursion, to generate the next set of cubes for this cube.
proc generateFractal(vector $center, float $size, int $recursionLevel)
This is the function we will use to generate a Fractal, as you can see we have 3 parameters, a Vector – center, a float size and the recursionLevel that we are at.
We can use these to determine how our current fractal piece should be generated.
polyCube -ch on -o on -w $size -h $size -d $size -cuv 4 ;
move -r ($center.x) ($center.y) ($center.z) ;
float $nextSize = $size/2.0;
float $offset = $size/4.0 + $nextSize/2.0;
vector $right = <<($center.x + $offset), $center.y, $center.z>>;
vector $left = <<($center.x – $offset), $center.y, $center.z>>;
vector $front = <<$center.x, ($center.y + $offset), $center.z>>;
vector $back = <<$center.x, ($center.y – $offset), $center.z>>;
vector $top = <<$center.x, $center.y, ($center.z + $offset)>>;
vector $bottom = <<$center.x, $center.y, ($center.z – $offset)>>;
Once we’re inside the function we create a cube and position it in the desired location, then create a list of new values ready for our next step – which we then create by calling generateFractal for every new cube, like so:
generateFractal($right, $nextSize, $recursionLevel);
generateFractal($right, $nextSize, $recursionLevel);
generateFractal($left, $nextSize, $recursionLevel);
generateFractal($front, $nextSize, $recursionLevel);
generateFractal($back, $nextSize, $recursionLevel);
generateFractal($top, $nextSize, $recursionLevel);
generateFractal($bottom, $nextSize, $recursionLevel);
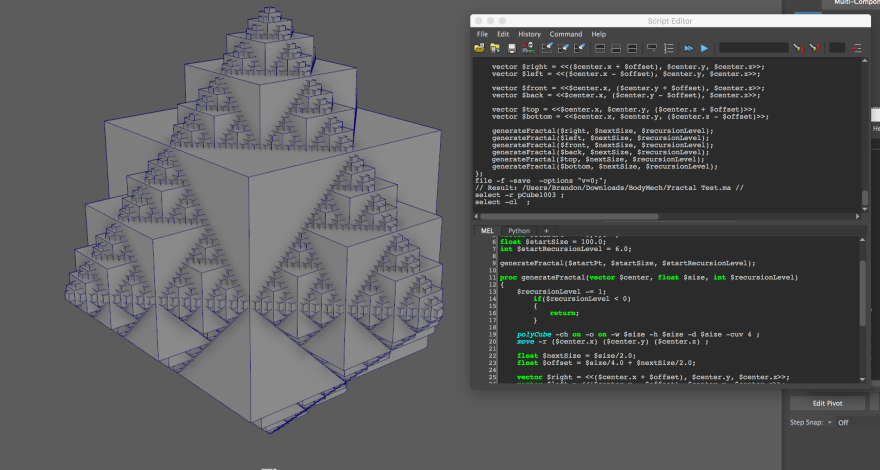
That’s the general gist of the code, it is simple on a logic level but can be complicated to execute to people who aren’t familiar with programming.
There are a few extra steps that should be taken to make sure you don’t break Maya, such as deleting all existing cubes before you run the code – and also setting your recursion level to something safe. I can go 9 levels deep before Maya starts breaking, but that all depends on your machine.

I saved this script to the Custom Shelf so now I have a handy little button to generate Fractals!
I could take this further by adding some custom UI for once I press the button, allowing me to set how deep I want my fractal to go – but that’s for another time!
Hope you enjoyed my little delve into scripting in Maya, I had fun!
1 Year and 1 Million Downloads Later… [Part 1]
I’m going to be honest, I’ve never really liked Life Simulator. It’s a game that is mechanically flawed, broken and just not the game that I wanted it to be.
I guess people liked the concept – and that’s why they downloaded it, but I have never been sure exactly why the game grew popular, I just assume it to be a stroke of luck – something that we all wish for in this industry.
A little background, before I get into this post-mortem/analysis. I’m Brandon Sidebottom, I’m a 17 year old “game developer” currently attending the UK’s version of College to study Animation and Games Design – I made a game that grew extremely popular. I also ruined that game. In this post I will be analysing what I did, explaining why I did it and hopefully finding out what not to do next time.
My initial plan Life Simulator was to release the app and update it over time, slowly adding more and more features. I wanted the game to grow and I wanted it’s player base to grow side by side with it.
This is what I had after two days – and I thought it was brilliant! Such a simple yet fun game, with room for depth.
I worked with this for a short while – taking in user feedback, improving the game with more jobs – features and mechanics. It was working.
A few things to note about this stage of development. My UI was quite cluttered – I had attempted to keep things clean, compact – and with the folks over at /r/AndroidGaming I optimised this interface further – but I still didn’t have enough room for everything that I wanted for this game.
Here are a few demonstrations of the changes that I made to better the UI – in the order that I made those changes.
You probably skipped through most of those – and if you didn’t I applaud you.
As you can probably see, the screen slowly became more and more cramped. This general theme wasn’t really working out, which brings me to lesson one:
Don’t be scared to Innovate.
I know that making a game can be tough, and you can easily grow fond of your creations, but if something isn’t working – don’t try to make it work. This was one of the traps that I fell into, to me I couldn’t imagine changing this theme because my brain had locked onto it – I knew it couldn’t work but I didn’t care I wanted to try and force it, which led to some… interesting results.
I found that asking for an outsiders view really helped me out. I was able to get another opinion on the UI and find out how to improve it. Having the game public through it’s whole development really helped with this – because people were actually helping and participating, which was amazing and if any of you players are reading this now, thanks for everything because I probably wouldn’t have made it without you!
Let’s call this stage one, that way it’ll be easier to reference this “era” of development once we get to the analytics!
The next stage of development was my first big “overhaul”. I wanted to maximise the amount of information on screen whilst not letting it get too cramped. I also wanted to add some visual appeal to the screen to bring in more players – I figured that would be the best thing to do, so we could grow faster!
6 days of hard work on the UI and I had created this. I honestly loved this theme – but it still had it’s flaws.
I had managed to free up a lot of screen space by making the navigation a swipe-to-reveal list, which worked well but wasn’t totally obvious to the users.
Everything was a lot cleaner at this point too – I particularly liked the Job List, the layout just made me tingle, I loved it.
Now, my main gripe with this interface was the way that it forced the users to play the game. It wasn’t very interactive and it didn’t feel personal – which is often something I like to do with my games, make them feel personal to the user – and with this, I just couldn’t accomplish that…
It felt like an endless game of lists, lists which meant nothing. Not to me anyway, however I’ve heard of players that preferred this version – and I did debate creating a standalone version with an interface like this but decided not to in the end.
I spoke with my team about the project, and began questioning the possibility of making something greater – something MUCH bigger than what this already was. Which brings me to lesson two.
Make the BIG decisions early.
At this point, I was just over a month into development, I was attached to my project – but not so far through that things couldn’t drastically change – which they did, thank God. If I had continued to develop the game this way, I probably would’ve burned myself out and got bored of it, which is often the case with my projects, and I know it’s the case for many of you fellow Indie devs out there. So don’t be afraid, not early on – just make sure that you think logically and choose the option that makes the most sense.
The big decision of course, was to convert the game from a text based game to a 2D side scroller.
My main idea here was to not only attract more players, but to create a much more immersive and in-depth world. Within a few weeks we had a basic prototype with a starting home set up – and the game was starting to take shape.
I’d like to say this portion of development went smoothly, but it didn’t. As I was 15 at the time – with next to no money, I was unable to pay for exceptional artists of any kind so getting actual art into the game was bothersome and often met with late deliveries and people not meeting deadlines. I think this in particular really slowed us down and lowered the potential for the game that we had, as it drained me personally as a developer – as I grew bored of working on the project…
However that didn’t last too long – soon I found myself just getting at it and developing without art, creating scenes out of just square sprites and colours so that I had a base to work with. This worked really well as I was suddenly sucked into making big new features and mechanics.
After a few short months of working like this, we released the update and it was extremely…
anticlimactic.
For around a month after the release, we sat at the download numbers we already had – we figured the game would grow by itself, suddenly with these great new graphics we had and how “fun” the core mechanics of the game were – we expected the world to just go “Hey, check out this game – this looks cool” and they didn’t.
Which brings me on to lesson 3.
Don’t expect the world.
Now this one is probably stupid, and I know a lot of you are probably thinking that’s obvious – but I was 15, I was hopeful – I didn’t expect the mobile market to be so damn harsh, but it is – and that’s the truth, I know that now and you should to. We as Indie Developers have to fight for our place in the market, otherwise the developers screaming louder, who have probably worked harder, will win.
I knew I had done something wrong – something was missing, and it was extremely obvious.
I brainstormed and together with my team we came up with ways to get more users.
Advertising? Nah, too expensive.
A publisher? I honestly don’t think the game is good enough to catch a publishers eye.
Social Media? I don’t really have many Facebook friends that will be interested in a game like this…
But wait.
What if other people who did have Facebook friends that would like this kind of game shared our game?
Which brings me to lesson 4.
Social Media is your best tool.
Within a few days I was able to add leaderboards, Facebook friend invites, twitter posts (“Hey look this is my high score, come and beat it!”) and I have to say, it took a week or two to kick in, but it worked.
Don’t be afraid to share the game with your friends, family or even those people that you have as friends but they’re not really friends, but they are. That little kick start can be all it takes. So use social media and think about how your app can use social media to grow.
Another thing to note with this, if you don’t have something “good” to show to these people coming from social media, or you don’t have that competitiveness that draws people in, you’re probably not going to get that far – look for ways to adapt your game to include these competitive leaderboards, or Facebook share rewards – they really, really do work – word of mouth is one of the best ways of advertising, and it’s mostly free!
I have spent around $40 on the development of Life Simulator at this point, and I have made nearly 2,000x more than that back in profit – so don’t jump to advertising straight away, it works, but so does this.
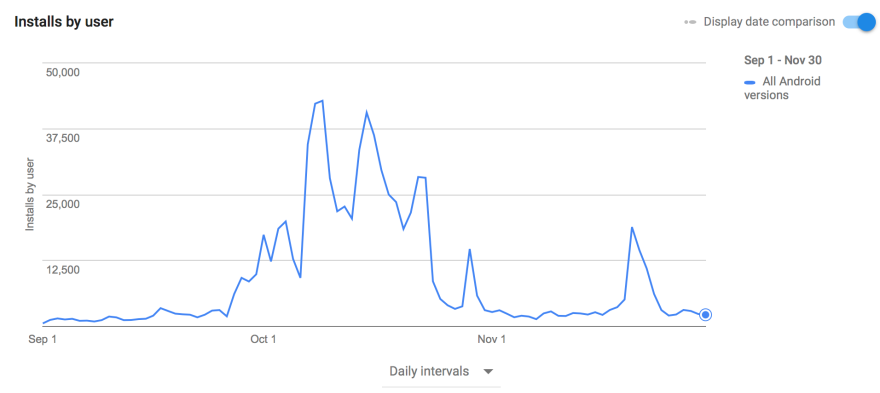
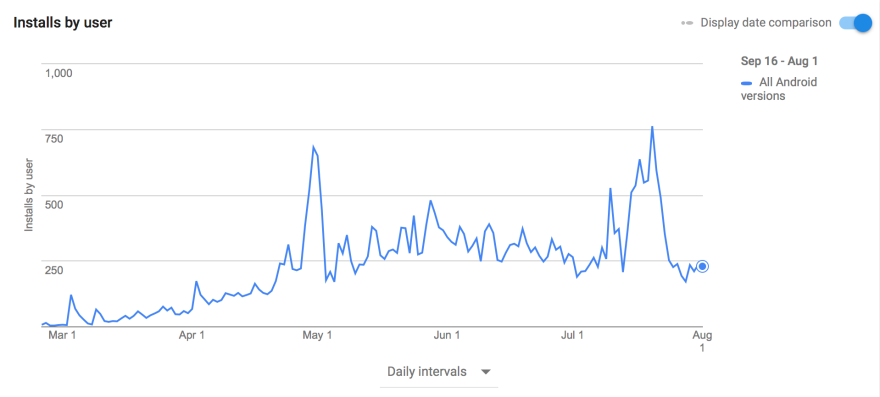
Here’s a snippet of our best download period, our best month being October of 2016. Over 750,000 downloads occurred within that one month, which was honestly crazy as hell. I have no idea what caused this – I have to assume I found a niche for a short while and failed to maintain it. I do admit that I slacked during this period, I filled to update the game as I needed to and I know that’s the reason I lost a lot of my player base.
I honestly hate the game, I am extremely interested in it – but I hate it in it’s current state, all I see is the flaws, which is hard – this is an envisionment of my dream game, but it’s not what I want it to be. Which brings me to lesson 5.
If you don’t like it, don’t stop just because others do.
I have to be honest, losing players has affected me – I feel like the game isn’t what it used to be, but that doesn’t bother me. I love the game that I have in my head. I created this game for me, not to make money – and not to be successful, sure that would be nice, but it’s not necessary.
At the end of a day, if you’re making your own game, there’s no reason it shouldn’t actually be your own. You are the one in charge, don’t fall into the mindset of trying to suit your player’s needs, suit your own first, and if those needs don’t align then explain that to them and hope that they understand – if they don’t, then that’s okay, you don’t have to make your game for them, make it for you.
Seriously. That’s where I went wrong – and that’s why I currently sit at 22,000 current installs – I currently have only 1.72% of my total downloads, but I don’t mind – because I’m making the game that I want to make, and you should to – because in the bulk of things, that’s all that matters.
Let me know if you have any suggestion on how I can improve this blog, I’d appreciate it – if you’ve made it this far I applaud you, and thanks for reading.
Peace!
How I’m Making Player Choices Mean Something.
Choice based games have been on the rise in recent years, most noticeably the TellTale Games series’.
These games tell stories to players whilst making them feel like a part of it, through the use of important decisions and choices that the players themselves get to choose. These, choices really bring the player in and allow them to become truly immersed in the tale, as it creates the illusion that the story is being built around them… But is it?
Often the case with games of this nature, they allow for the player to merely change the steps inbetween a definite start and end. So whilst the journey may seem somewhat unique, by the end – everybody has the same thing.
This is of course great in terms of keeping everything consistent – players will all be able to discuss the same topic and give opinions on the story arch as a whole, but does that ruin the personal feeling that the story gave us? Those personal choices that WE made, are they still as personal and therefore as engrossing as they once were?
I don’t think so.
With my recent venture into choice based games – Life Simulator GO, I decided to come up with a system that would mean a players choice permanently effects the game, no matter how big or how small.
The Game
Life Simulator GO uses what I’m calling a “card” based system. The player has a current deck of cards, each with scenarios which grant a choice with two options.
The current deck is switched once the player enters a new “stage” of life. For example, from Teen to an Adult. This switch will set the current deck to a base set of adult cards, and any cards that have been added to the adult deck through choices on previous cards.
Each choice will effect the player in different ways, with stat changes and new cards being added to the player’s decks. This would allow for a player to get arrested at a young age for doing illegal activities, and then that ruin their life as an adult because they would be unable to get a job.
I believe that this system of feedback is key to creating an immersive life for the player to live. The game is truly shaped from the choices that you make, and you have to choose the options that will benefit you most.
This system also allows for your character to have memories, memories that you share. For example, you could choose a toy towards the beginning of your life, simply by playing with it more – and then we could add a card to your elderly deck, in which you find that same toy. Little moments like this allow for an immersive game session that feels like you have just lived a whole story, a whole life.
Life Simulator GO is a game that is supposed to be played quickly, maybe in between classes at school – or whilst waiting for a bus. To make this possible, I’m focusing on replayability by providing many “cards” that are chosen from random based on your current deck. This means that as time is advancing in the game, you won’t be able to experience every card in one playthrough, as it simply won’t be possible.
With our first release, we’re hoping to have around 200+ base cards. This may not sound like many, but this is just the base set, so cards that are added to your deck as a result of a choice aren’t included. We don’t have an expected number of these “set” cards, but I’m expecting them to be into the hundreds.
I’ll be doing some more blog posts about the theory behind this game and the progressions that we make as we develop it.
If you’re interested in working with us to create cards, be sure to let me know via an email (or just ask if you know me) – you’ll get your name in the credits of the game and you’ll be able to work closely with myself and the team!
Thanks for reading!
50+ High Quality Texture Dump (01/05/2017)
I’ve decided to release these textures that I have used in my work to the public. All of these textures are Public Domain and free to use in ANY work (including commercial).
All textures are 3024×3024.
Feel free to email me at brandonsidebottom@outlook.com if you have something you want to share/ask.
Enjoy!


To keep up to date with any of my other projects/releases, follow me on Twitter HERE
Summer Homework 2016
My first homework assignment for college involved coming up with a game concept based around Forests. This is the research that I did and the idea that I came up with.
(Please note, I was asked to present the information in the form of a moodboard, but due to limited resources this is the best that I could do. Here’s a moodboard anyway)
First I looked at real, well-known forests around the world. This I found most interesting.
 This is a picture taken of a tree nicknamed “General Sherman”, in the Sequoia National Forest. What fascinates me most about this forest is how large all of the trees actually are, General Sherman in particular is currently 83.8 m tall! (Sources: image, facts)
I next looked into some fictional forests. This included images from the famous movie Lord of The Rings, DeviantArt and other video games.
I found some images that had this ominous blue glow in the forest and thought that this was a really nice look, it was unique – not seen in many places but used extremely well in a game called Ori and The Blind Forest.
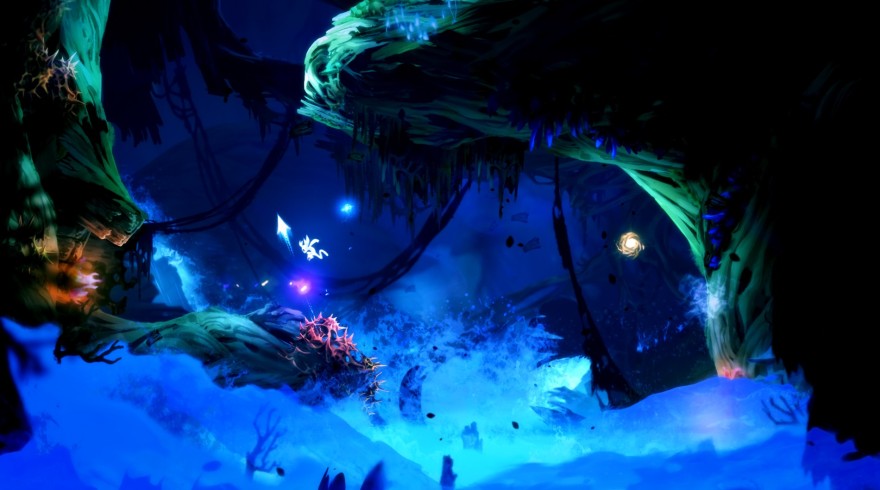
Ori and the Blind Forest is an indie game released for PC, Xbox One and Xbox 360. I love the stylised art style of the game and think that the colour palette is used to perfection. The game won awards for it’s animation and art design whilst being nominated for others.
So I had an art style that I liked, I began to think of other ways to use the colours and create a unique stylistic experience by taking a different approach.
I wanted to create a 3D experience, something that wasn’t necessarily a game, but then not a movie either. Recently there have been many games like this, and I feel like this “magical” art-style suits this sort of game. With this, I began to expand upon the idea.
The Idea
The Walk (name in progress) is a game that sets the player on a path in a mystical forest, a forest that transforms from a beautiful, well-lit wonderland into a dark, eerie nightmare. A strong atmosphere could be set into place by a range of mediums creating a nice transition from a relaxing and sombre experience to an intense and scary existence.
A range of colours will be used in a way that changes the mood of the player. For example, one area of this forest could have a heavy pink theme, with blossom trees and falling petal particle effects; whereas another area of the forest would have a strong dark blue theme, eventually turning to black with frog ponds, mist clouds and thicker, deciduous trees.
Lighting would change throughout the walk, but there would be one clear change that the player would notice. The overall mood would get a lot more glum as we transition from a bright, cheerful light – to a dark, gloomy and eerie light by the end.
Sound would follow the same pattern. At first, we would hear natural ambience: birds chirping, frogs croaking, lakes moving and the leaves blowing in the wind. But by the end the player would be hearing: twigs snapping, wolves howling and maybe even voices in their heads.
This experience would create a range of emotion for the player as they travelled through the forest and experience the switch in atmosphere themselves. The beautiful nature of the beginning would immerse them enough to play through the scary theme at the end. This could be developed to tell a story symbolically, for example – the walk is symbolic of a persons life, we make the Character Controller get slower the deeper into the woods you get, and at the end of the path – a grave.
There’s a lot that can be developed with this idea, but I wouldn’t want to make it into anything that would last longer than 30 minutes. I don’t think that many mechanics are needed except for walking, as they would draw the player away from the scene around them and ruin the immersion.
So that’s my game idea, The Walk.
